Table of Contents:
- Which firmware do I need for my printer?
- Flashing Firmware
- Recovering from a black screen after firmware update
- Help! My screen shows a picture of clouds!
- My screen is in Chinese, how do I switch it back to English?
- My Print Speed shows a crazy number and the printer goes nuts!
- How do I wire up a BLTouch?
- I’ve added a BLTouch, how do I set my Z-Offset?
- When I try to print, my printer just ejects all the filament!
- I want to use hardware retraction, what do I do?
- PID Tuning
- What are the Vref voltages for the v4.2.2 board?
- What is the recommended Start G-Code?
Which firmware do I need for my printer?
Unless you have changed the mainboard yourself, to date, every Ender 3 V2 has shipped with a v4.2.2 mainboard. It is important that you ensure that you use the correct firmware for the mainboard installed in your printer.
Loading firmware built for a v4.2.7 board onto a v4.2.2 mainboard will not work.
You can find the version of the mainboard printed on the PCB itself - see the following picture as an example:

Symptoms of installing the incorrect version of firmware for your mainboard include:
- Printer does not move when home selected
- Printer’s beeper emits a constant tone
- Printer will heat hotend and bed, but not move the print head
Flashing Firmware
- Make sure your SD Card is 8Gb or smaller and formatted as FAT32.
- Copy the downloaded binary firmware file to the root of the SD Card
- Insert the SD Card into your printer and turn it on
NOTE: The printer will remember the last filename that has been loaded onto the printer and ignore the same file on the next boot. To flash the same firmware, you need to rename the file to something different.
Recovering from a black screen after firmware update
Most firmware flashing failures are caused by an incorrectly formatted or too large SD cards. Ensure that you use an SD Card that is 8Gb or smaller in size, and is formatted as FAT32. If you struggle with formatting, you can use SD Memory Card Formatter available for both Windows and Mac.
You must rename the file each time you want to flash a specific firmware - as the bootloader will ignore the currently loaded filename on each boot.
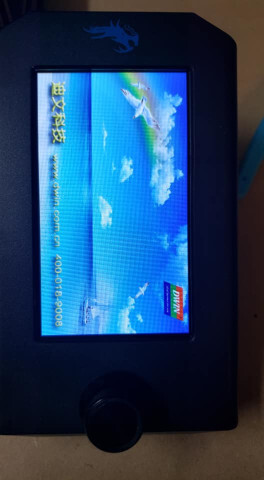
Help! My screen shows a picture of clouds!
If you see a picture of clouds like below, you can recover this with the following steps
This will prepare the SD Card for use and will wipe everything on the SD Card. Make sure you have backed up anything you want to keep before proceeding.
- Connect your SD Card to your PC
- Open a Windows Command Prompt
- Type
diskpartand hit enter - Show the disks on your system:
list disk - Select your SD card using the Size as a guide:
select disk number - Type
cleanand hit enter - Create the smaller partition:
create partition primary size=2000 - Format the new partition:
format fs=fat32 quick - Mount the drive:
assign - You should now see the newly created and formatted partition in Windows Explorer. Open this drive.
- Download this archive to your PC and extract it to the SD Card
- Insert the SD Card into the back of your screen and turn the machine on
For a video on how to disassemble the screen and flash the screen’s firmware AFTER preparing the SD Card as above, you can watch the following video:

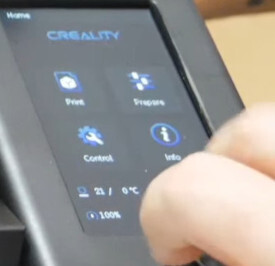
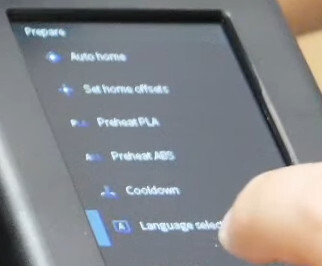
My screen is in Chinese, how do I switch it back to English?
Select the top right “Prepare” icon, and then the “Language” option
My Print Speed shows a crazy number and the printer goes nuts!
This is caused by a current bug in the display code and triggered by attempting to print a file from the SD card that has a filename longer than 22 characters and the .gcode file extension.
This should be fixed in all recent firmware versions.
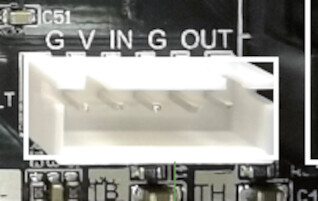
How do I wire up a BLTouch?
If you got your BLTouch direct from Creality, you can use the following picture:
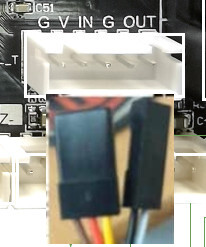
If you obtained your BLTouch elsewhere, your cable may have different wiring colours / standard. Use a multimeter or trace back each wire on the cable as per the following:

I've added a BLTouch, how do I set my Z-Offset?
Firmware from 20210909 onwards has the Z-Offset wizard available via the LCD. Navigate to Prepare → Z-Offset Wizard.
If you are running an older version of firmware, there’s a great YouTube video on this by 3DMN. You’ll need to connect a computer to the USB port of the printer, and have a program line Pronterface ready to go.

In text, this boils down to the following to be entered into Pronterface or the OctoPrint Terminal:
- Reset the Z Offset to zero:
M851 Z0 - Save the offset:
M500 - Home the printer in all axis:
G28 - Move to where we think Z height 0 is:
G1 F60 Z0 - Disable software end stops - Be careful!:
M211 S0 - Use paper and the method in the video to bring the nozzle down to the paper
- Show the current position:
M114 - Set the Z-Offset as per the Z position reported:
M851 Z<Z position from M114 command> - Enable software end stops:
M211 S1 - Save the EEPROM:
M500 - Rehome the printer:
G28 - Move to zero offset to confirm position:
G1 F60 Z0
When I try to print, my printer just ejects all the filament!
The filament runout sensor is enabled by default. This causes problems if you don’t have a runout sensor installed as the printer thinks that your filament has broken or run out. To fix, you can do one of the following three steps:
- Add
M412 S0to your Start G-Code in your slicer - Use Pronterface hooked to your printer and run
M412 S0followed byM500to save the setting. - Factory reset your printer to the defaults (which disables the filament sensor) with
M502followed byM500to save.
If / When you want to install a filament runout sensor, you can plug it in, then enable it with M412 S1 in your start G-Code
I want to use hardware retraction, what do I do?
Firmware retraction turns the retract operation into a single command instead of two commands, one to pull back the filament, and one to raise the Z height (Z-Hop).
You’ll need to enable Firmware Retraction in the Printer Settings plugin for Cura. Other slicers may vary.
To set your retraction settings, you can use the M207 (Retract) and M208 (Recover) commands as follows:
; Set the retraction amount to 80mm/sec (80 x 60 = 4800), 3mm distance, and Z-Hop height of 0.3mm
M207 F4800 S3 Z0.3
; Set the recovery (prime) speed to 80mm/sec (80 x 60 = 4800)
M208 F4800
PID Tuning
Newer firmware has this available via the Control → Advanced Settings → Hotend PID Settings and Bed PID Settings.
If you are running an older version of firmware, PID Tuning is not available via the touch screen interface. Using a program like Pronterface, you can connect to your printers serial port over the USB interface and use the M303 command to begin the process.
Hotend tuning:
M303 E0 S<temp> C10 U1
Bed tuning:
M303 E-1 S<temp> C10 U1
Use M500 to save these settings to your EEPROM
What are the Vref voltages for the v4.2.2 board?
Creality has advised the following Vref values are stock for the Ender 3 V2 (v4.2.2 mainboard):
| Driver | Voltage |
|---|---|
| X | 1.18 - 1.2 |
| Y | 0.99 - 1.01 |
| Z | 1.18 - 1.2 |
| E | 1.38 - 1.4 |
There have been reports of long prints heating up the extruder enough to melt PLA as it feeds. There have been some reports of success using the following Vref settings. Note that lowering the Vref also lowers the stepper motor power, so going too low may lead to missed steps.
| Driver | Voltage |
|---|---|
| X | 1.14v (580mA) |
| Y | 1.14v (580mA) |
| Z | 1.14v (580mA) |
| E | 1.27v (650mA) |
The adjustment procedure is as per the following video, however do not copy the voltage values in the video as these are not correct for the TMC2208 stepper drivers.
")
What is the recommended Start G-Code?
This has been moved here: Improved Start G-code for printers (Cura and PrusaSlicer) - Frequently Asked Questions - Marlin Firmware Service - Forum